Category Archives: Makeover

Little Boys’ Bedroom Redecoration

Standard

Here is a little bedroom redecoration teaser…..I am waiting for the room to be repainted before I can really get my hands on the room but take a look at what I have already purchased for the redo…..

Just before Christmas we decided to move our two boys into a room together. We weren’t sure how it would all go, but we could not be happier.

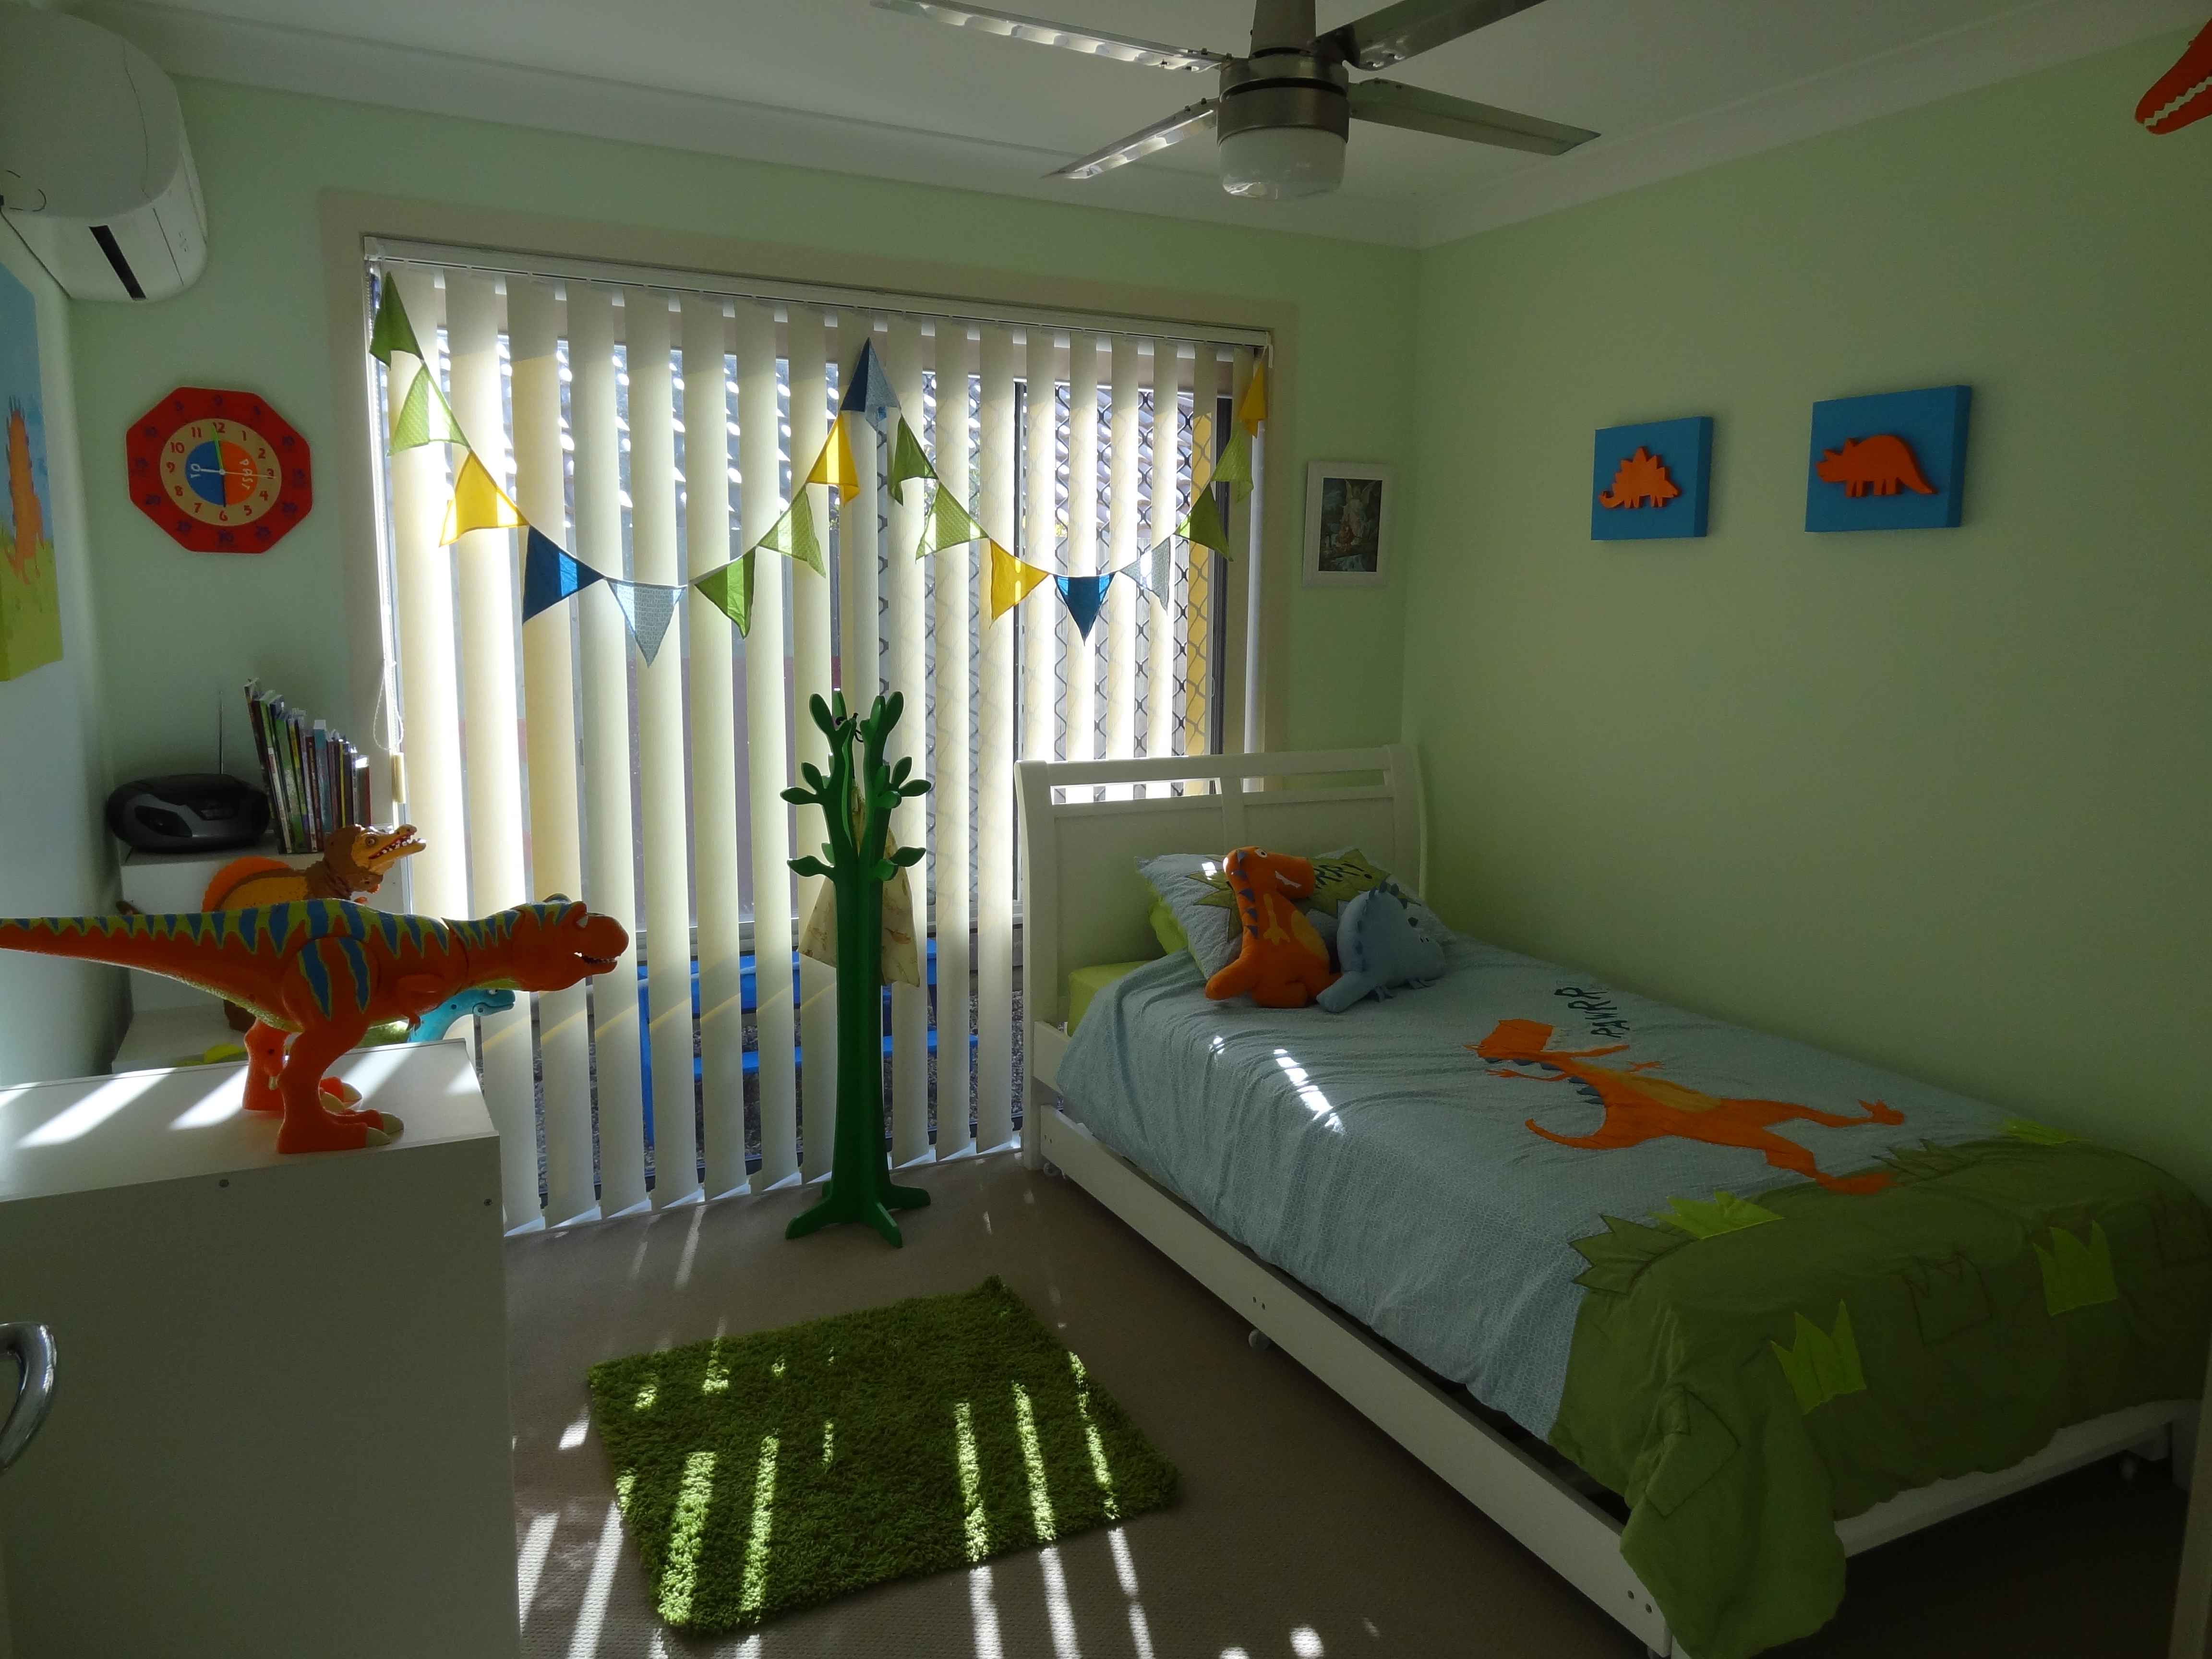
The room was previously decorated in a dinosaur theme…… Dinosaur themed boys bedroom

And this worked for both of them while I could buy matching dinosaur linen for our youngest’s cot. However, once Master C moved to a big bed, I could no longer source a comforter to match his brother’s.  Apparently that is a big deal to a 2 year old.

So I was forced to visit my favourite Children’s linen store, Adair’s Kids 😉 . Here we chose a travel/plane themed ‘Toby’ comforter and the matching cushions.

Decorating a Boy's Room

Decorating a Boy's Room

Decorating a Boy's Room

Isn’t the suitcase cushion the cutest!? That is what really sold me on the whole set.

I didn’t love the matching artwork that they sold in Adairs, so it took some hunting to come up with something to go on the walls.  Finally I found two very amazing Etsy stores with the most amazing prints.

Firstly, I picked up this set from the lovely Trish at Strawberry Jam Studio.

Redecorating Little Boys' Room


And here it is framed waiting to be hung in a freshly painted room. (Sorry for the poor picture, the weather here is still miserable!)

Decorating Little Boys' Room

I cannot rave enough about how amazing Trish’s customer service was. Thank you, Trish!

The colours perfectly suit the linen. The boys love the dog and giraffe flying the planes and I love the typography and quote.

The other piece I picked out for the room was this brightly coloured world map from Wallfry. Decorating Little Boys' Bedroom

Decorating Little Boys' RoomAgain, the colours are perfect and the Geography teacher in me loves a map.

So there is the start of the makeover. I am itching to sort out some better storage solutions in this room now that Master O has started school. Stay tuned!


Hello Again…and Some Changes About the Crooked House

Standard

Hi all! I have been super slack on the blogging front of late.  My eldest started primary school and I have been focusing much of my attention on getting involved and getting to know all the new faces.  I have also been lapping up as much Mummy and Master C time as possible while big brother is at school.

So to ease myself back into this blogging caper, I thought I would share with you some pics of some of the little changes I have made around the Crooked Household, starting with my dining and lounge room.

Post- Christmas I blogged about my desire to inject a lot more colour into the house, especially during our Australian Summer. I showed you the mini makeover I made on the bedroom (see here) , now the makeover has spread to the main section of the house.

Just before Christmas we purchased a new dining table and chairs, as well as a matching TV cabinet for the lounge. We went for a chunky, light coloured wood table and modernised it with some industrial looking metal chairs.There Was a Crooked House

There Was a Crooked House

With a lovely new table, I had to pick up a few new table runners to dress up the room.

Here is the red and maroon one that ties in the feature colours in our kitchen.There Was a Crooked House

There Was a Crooked House

And this floral one because I am a sucker for anything green, blue and teal.

There Was a Crooked House

This area also got a new clock as our old one died.

There Was a Crooked House

The lounge could not get ignored a mini makeover, so I picked up these colourful cushions to bring out the main colours in our canvas collage.

There Was a Crooked House

I just love the change that these pieces and colours bring to the main area of the house. Everything seems so much more fresh.

Soon I will share with you the other changes about the house, but for now, have a great day.


Organising Children’s Art Supplies With Tupperware

Standard

A while back I gave my pantry a makeover.  With the addition of the Thermomix in the kitchen, my pantry underwent a change.  There were a lot less cans and processed foods and a whole lot more basic ingredients. I desperately needed more storage containers and I was just not prepared to drop a grand on Tupperware to house it. As I hate to miss-match, the Tupperware I did own, came out of the pantry and went into storage.

Looking at the Tupperware taking up space in my storage cupboard today, I decided I had to make use of it.  I went to my most hated storage solution, the kids’ craft tub and decided that Tupperware might just save the day.

The old craft tub was huge and filled with a million bits and pieces. The half empty packets and the buttons and  beads laying loose made finding what I needed a challenge.

After a good purge and some help from the littlies to sort, we filled most of my spare Tupperware containers.

Using Tupperware to Organise Craft Supplies

Using Tupperware to Organise Craft Supplies

If our little collection of craft supplies should exceed our Tupperware collection, I will just pick up the super cheap knock-off version you can get in Kmart.

Kmart's Tupperware Knock-off

I love that I regained some space and made good use of the once wasted Tupperware.  I think that craft time will be a lot less painful with this storage solution. 

Time for a Change

Standard

The other week I was just not feeling the ‘vibe’ in my lounge room.   The room needed a change.  I needed a change.

Before I had a chance to spiral into a lounge room funk, grab the credit card and hit the shops for a new look, I pulled out the sewing machine.

One of the easiest decorating changes that can be made in a lounge room is to add new throw cushions.  They can change the whole feel of the room on the smallest of budgets.

I had bought some great material some time back in red and aqua.  I loved the patterns and the colours were perfect for the lounge room.  The red was already the highlighted colour in the room, but the blue could help tie in the tones of the photo canvas collage hung on the wall.

Photo Canvas Collage

Before I really had time to think about it, I had run up 5 envelope cushions.  You can read my tutorial on how to make these easy pillow slips here.

Time for a Change : Cushions

I like the two patterns and colours together. The aqua and white has really given the lounge a lift.

A few days after I threw together the new cushions, I was at Ikea and picked up this warm aqua throw for next to nothing.  It should help to keep us cozy as the cooler weather sets in.

A Time for a Change: Cushions

So on a little budget, with just a bit of time invested, I was able to give the lounge room (and myself) a lift.


A Bedroom for a Dinosaur Loving Boy

Standard

It occurred to me the other day, as I was giving Master O’s room a quick tidy, that I hadn’t shown you all the changes we made in his room.

Towards the end of last year, as Master O’s 4th birthday loomed, we struggled to find him a present.  We really didn’t want to buy him toys as we knew he would receive more than enough as gifts from the family.  I really had no inspiration until I found myself staring absent-mindedly into a store window while waiting for my sister.  As she arrived and I turned to leave, I realised what I had been staring at…..the cutest range of dinosaur linen and accessories on a fantastic sale.  There and then I decided his present would have to be a dinosaur room makeover.

The day before his birthday party, while he was a daycare, I set about transforming his room.  Previously it had sported a nautical/pirate theme which I shared in these posts here and here, but this is what it looked like on the morning I started the transformation.

Dinosaur themed boys bedroom

After a good clean up and rearrange, followed by the addition of  the new duvet cover, matching cushions and bunting, the room looked a lot fresher.Dinosaur themed boys bedroom

Dinosaur themed boys bedroom

Dinosaur themed boys bedroom

I added a few other nick nacks that suited the theme, like these cute bookends.

Dinosaur themed boys bedroom

I had already added a padded cushion to the Trofast toy storage units to make a reading seat, but now I could see how well my colour choice matched with the linen. You can read about how I made the seat  here.  A little rearranging of the Trofast tubs I already owned enabled me to bring the colour green into this area of the room as well.

Dinosaur themed boys bedroom

I had tried to purchase some artwork for the walls in time for his birthday but I couldn’t find anything that matched the colour scheme. Master O didn’t mind, he was chuffed with the transformation.  The walls remained blank until about 3 months ago when I returned to the linen store and found a matching dinosaur canvas in stock.

Dinosaur Themed Boy's Room

So with one wall decorated,  I thought I might have to make something for the other wall – but what?  On holidays last month I came across a stall that sold all manner of dinosaur cutouts,  2D and 3D.  The were amazing and so well priced that I had to be restrained.  I purchased 2 x 2D cutouts and after a bit of spray paint, attached them each to a canvas.  It was a such a simple art solution and they really do pop with their shiny bright orange paint.

Dinosaur themed boys bedroom

The other purchase I made was 3D pterodactyl.  After a couple of coats, also in the bright orange paint, I attached him to the ceiling.  I was concerned that he might be a bit scary for a 4-year-old, woken in the middle of the night, but Master O has entrusted the pterodactyl with the task of keeping him safe.

Dinosaur themed boys bedroom

So after stalling for nearly 4 months with the artwork, the room is pretty much complete now.  Master O received a couple a big dinosaur figurines for his birthday and Christmas that fit in perfectly with the colour scheme so they now reside on top of his Trofast unit and look very much at home.  We also picked up a hat stand shaped like a tree on sale at Target.  It is the perfect place to hang his Kindergarten and library bags when it is not some how involved in some imaginative dinosaur play.

Dinosaur themed boys bedroom

Dinosaur themed boys bedroom

Dinosaur themed boys bedroom

This really has evolved into the perfect room for our dinosaur loving boy.  What are you favourite themes for little boy’s rooms?

Creating our Childrens’ Outdoor Play Area

Standard

In all the hustle and bustle of the last few months I completely forgot to share the outdoor play area we created for the kids. Take a look……

When my husband and I purchased our house pre-children, we were happy with its small yard.  We were young and didn’t want the upkeep of a bigger lot.  It is perfectly located across the road from a massive park, so we knew that when kids came along, that having a small yard didn’t mean they would miss out.  But since having kids we have realised that having space for them to play in the yard is still important.  Wanting to inject some more kids space into our place, we set about utilising our almost unused side of our house.

This side of the house was only ever accessed to hang laundry.   It only housed some pots and a mostly unused water tank.   There is no lawn, just stones.  Sorry, I didn’t even think about taking a ‘before’ photo!

My husband, bless Him, started with grand plans for softfall cover and a fort but I had to reign in the enthusiasm.  The truth is we are outgrowing our house.  We have two small boys now who will soon grow into big boys.  We will need to bite the bullet soon and move, so any kid’s space additions need to be easily removed for future buyers.

After removing the water tank and rearranging the pots, the space just sort of evolved.  There were no solid plans, we just set about pulling together bits and pieces we thought would work.

Master O loves the sandpit at daycare so the first addition to the space was one of these.  We made this by bolting together some sleepers and giving it  a lick of gorgeous ‘Regatta Bay’ blue paint.

048

While we were painting, Master O kept himself busy dropping stones through a piece of old plumber’s pipe.  My hubby, clever clogs, saw a toy in the making.  The boys can now shovel the sand in the top to have it shoot out the bottom.

Outdoor Play Area

When at the park, both my boys love to play with the steering wheel and  telescope.  On a visit to my local hardware I came across these playground toys – a boat’s steering wheel, a periscope and a phone.  Rather than attaching these straight to the fence, we first cut and painted a section of blueboard to hang on the fence for them to be attached to.   This panel became the activity centre.

Outdoor Play Area

With the left over blueboard we cut it into two pieces which we also attached to the fence.  Master O is learning to write, so I thought the addition of chalkboards would be a great idea.  I sourced some lovely red coloured chalkboard paint to cover them.  Outdoor Play Area

Outdoor Play Area

I had a couple of Ikea Bygel rails going unused so we attached these here and hung the matching Bygel containers to hold the chalk.

Outdoor Play Area

We were going to leave the area as is until we stumbled across this cute picnic table.  It was lovely and sturdy and had a sandpit hidden under the lid.  With its addition, the area became more multi-use and an area which we could spend more time in.  Now we can have morning or afternoon tea and a play out there, or retreat there to do our craft projects with less chance of mess.

Outdoor Play Area

046

We have been using this area for some months now and the boys love it.  It was inexpensive and it came together in a flash.  I am so glad we did it!

Study / Craft Room Reveal

Standard

Yesterday, I wrote about my decision to convert our playroom back to a study / craft room and the steps I took to complete the room at a fraction of the cost of the cabinetmaker’s quote.  You can read about that here.  Well, today I thought I would show you the completed room and some of the storage solutions I have put in place.

There were two essential things this room needed – lots of compartmentalized storage, and lots of bench space.

I love the Ikea Expedit units, so I used these as a basis for the design.  I purchased 4 of the 4 cube units to sit under the benchtop on one wall, and cut one down to suit the width of the room.  I chose not to have these attached to the each other, the wall or the benchtop so that I have the flexibility in the future to remove these if I wish.  I got the builder to put timber moulding in the gap between the units and the benchtop though, to give the impression they were built in.

I wanted the room to look neat and to maximise the storage capability, so I purchased Lekman boxes to fill the units.  To help keep track of where everything is stowed, I created little tags which I have attached to the fronts with string.

The benchtops I purchased from our local hardware store were meant for a kitchen or laundry, but are perfect for this set up.  I got the builder to cut them to the size and attach them to the wall.

The empty benchtop above the Expedit units has given me a new space to craft.  For the moment, most of my supplies are comfortably stored in the boxes below.  Should I decide on some benchtop or wall storage of my most  used items, there is heaps room to do this.

At one end of this bench I have set up a paperwork and mail station.  I attached two lots of Kvissle newspaper racks from Ikea to the wall to help corral the family’s paperwork.

At the other end of the bench, I have used a large vase to store my wrapping paper.  I was forever throwing out wrapping paper as it would get squished in the cupboard.

The benchtop on the other wall is for ‘office’ work.  There is heap of room for my computer and printer with lots of bench left spare to do paper work.

I have neatened up my cables and stationery bits and pieces with other items from Ikea’s Kvissle range.  You can see what nifty pieces they sell here.

Above this bench, I have attached two huge floating shelves to store books, everyday files and some nick nacks.

On the other side of the room, I have decided to keep it all pretty simple.  We have some lovely big windows that let in the light, so I didn’t want to obstruct that.

I purchased the red chair from Freedom, so we still had a place to sit and read in the room.

On the day I found the chair, my husband fell in love with the big lighthouse print, so it came home with us too.

I am loving the new study / craft room.  I feel I can get more done in this calmer, less cluttered environment. I did wonder whether the boys would miss having a room almost all devoted to their play, but the shake up has been  great in more ways than one.  I will share that with you soon.


Study and Craft Room Creation

Standard

For a small and relatively new house, ours seems to undergo an awful lot of change and renovation.  It feels like there is always a project on the go, or is that because it takes us forever to complete something?

Last year we decided to convert our very under-used study into a playroom/office to help clear some of the toys from the living areas.   You can get more details about that here and here, but these are a few pics of what it used to look like.


It was a great idea and it worked quite well until maternity leave meant I had more time for blogging and crafting.   I needed more desk space and we all needed more storage space.

Taking the bull by the horns, the kid’s rooms were rearranged to include the toy storage that once lived in the playroom.  I then spent a long time looking at pictures for inspiration and eventually came up with a plan for the room.  It was going to be clean and quite simple with oodles of bench space.

I had a few cabinet makers come out to quote the job and what I wanted was going to cost between $6000-$10,000.  That pricing was ridiculous.  I think the job was too small for them and they were quoting to make it worth their while.

Not one to give up or pay too much for anything, I started to work out a solution.  I sourced all my own materials, bought flat pack storage and got a builder to install what I couldn’t do myself.

I ended up with almost exactly what I wanted for a fraction of the cost.

Tomorrow, I will show you what we did.  But for the moment take a look at this pic from after the builder left.

Outdoor Wall Art – Frame Collage

Standard

It’s no secret that I love a good collage.  They are scattered all about my house.


It is no surprise then,  that when I gave my alcove area a bit of a makeover (you can read about it here and here), I incorporated another collage.

After making a nice area to sit, the area was already so much nicer to look out at, not to mention, use.

But I wanted to add something more interesting to look at on the fence.

I had potted our massive agave plant into a terrazzo pot that had once had another life as a water feature in the same alcove.  I had put this up  by the fence line and loved the green leaves.

Wanting to inject some more gorgeous green into the view, I gathered a collection of old frames.  A good spray paint and a lot of nails later……


my outdoor collage was complete.

I’m loving my new green outlook from indoors. Much better than the plain old fence.


Streamlining and Baby-Proofing Vertical Blinds

Standard

I have finally begun the spring clean of the Crooked Household.  This year, as I make my way around the house, I will be fixing our vertical blinds.

Our blinds are a few years old now so they have the chain link bottoms.

I am not the biggest fan of vertical blinds, especially these chains on the bottom.   They get caught up, twisted, knocked off and deteriorate with sun exposure.  My 9 month old has broken quite a few of the clips that connect the chains to the blinds, leaving the chains to sit on the ground. This was becoming a little messy and somewhat dangerous with a crawling baby in the house.

As the blinds are near perfect, except for a few sections of broken chain, I couldn’t justify replacing the blinds.   Doing a little bit of internet research, I came across a company online that sold bulk packs of vertical blind weights without the chain.  They were a bargain.

It has been easy to replace the chain weights with the linkless weights and now I no longer need to deal with those ugly, annoying chains.

The blinds are now less messy, sit in a streamlined fashion and are no longer attracting a 9 month old for play time.  Well worth the small investment of time and money.